Mastering the Art of 3D Layered Christmas Tree Ornaments: A CNC and Laser Cutting Guide
The holiday season is a time of warmth, nostalgia, and creativity. For many crafters, woodworkers, and small business owners, creating unique decorations is not just a hobby but a way to bring personal joy into homes. Among the most popular trends in recent years has been the 3D layered Christmas tree ornament. These intricate designs offer a modern twist on traditional decor, combining geometric precision with festive charm. If you are looking to enter the world of digital fabrication or simply want to create stunning holiday gifts, this guide will walk you through everything you need to know about designing, cutting, and assembling these beautiful ornaments using CNC and laser cutting technologies.
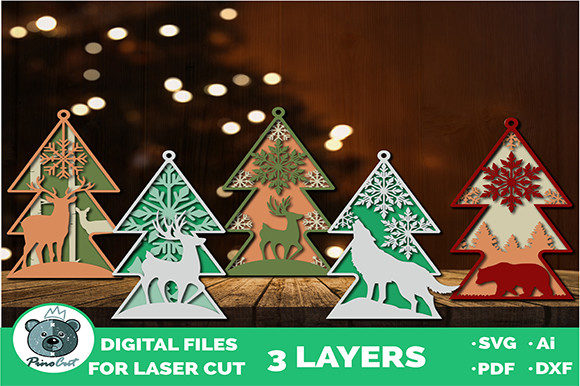
What Are 3D Layered Christmas Tree Ornaments?
At their core, 3D layered ornaments are decorative pieces constructed from multiple flat layers of material stacked together to create depth and dimension. Unlike traditional flat cutouts, these ornaments use interlocking tabs, slots, or adhesive stacking to form a three-dimensional shape. The result is a visually striking piece that catches light beautifully and adds texture to any Christmas tree.
These ornaments are typically designed using vector graphics software, which allows for precise control over every line and curve. This digital approach ensures that each layer fits perfectly with the next, eliminating guesswork and reducing waste. Whether you are crafting a simple geometric star or an elaborate winter scene, the principle remains the same: break down a complex 3D object into manageable 2D slices.
The Power of Digital Vector Files
The foundation of any successful laser-cut or CNC project lies in the quality of its digital blueprint. In this context, we provide comprehensive vector drawing files in electronic format. These files are essential because they contain the mathematical instructions your machine needs to follow.
Understanding Vector Formats
Vector drawings differ significantly from raster images like JPEGs or PNGs. While raster images are made of pixels and can become blurry when scaled up, vectors are made of paths defined by mathematical equations. This means they can be resized infinitely without losing quality. For laser cutting and CNC routing, vector files (such as .DXF, .AI, or .SVG) are the industry standard. They ensure that your cutter follows exact coordinates, resulting in clean edges and perfect alignment.
Customizable Design Layouts
One of the greatest advantages of our provided projects is flexibility. Once you download the archived files, you have full access to modify the design layout to suit your specific requirements. Perhaps you want to change the color scheme, adjust the size of the ornament, or add personalized text. With editable vector files, you can easily tweak these elements before sending them to your machine. This level of customization ensures that every ornament you produce is unique to your vision.
Material Selection: Why Plywood?
While 3D layered ornaments can be made from various materials, including acrylic, MDF, and solid wood, we strongly recommend using 3mm plywood for this project. Here is why plywood stands out as the ideal choice for both beginners and experienced makers:
- Affordability: Plywood is cost-effective, making it perfect for mass production or experimenting with new designs without breaking the bank.
- Workability: 3mm thickness is thin enough to be lightweight and easy to handle, yet thick enough to hold structural integrity during assembly.
- Finish Quality: High-quality birch or maple plywood offers a smooth surface that takes paint and stain exceptionally well.
- Eco-Friendliness: Many plywood options are sourced from sustainably managed forests, appealing to environmentally conscious consumers.
Using 3mm plywood also minimizes the risk of warping and makes the cutting process faster and more efficient, especially for laser cutters which burn through thinner materials quickly.
The Cutting Process: Laser vs. CNC
Both laser cutting and CNC routing are excellent methods for producing these ornaments, but they serve slightly different purposes. Understanding the difference can help you choose the right tool for your needs.
Laser Cutting
Laser cutting uses a high-powered beam of light to vaporize material along the vector path. It is renowned for its precision and ability to create intricate details. For delicate ornaments with fine inner cuts or complex patterns, a laser cutter is often the preferred method. It produces clean, sealed edges that do not require extensive sanding.
CNC Routing
CNC routers use physical bits to carve away material. While generally slower than lasers for thin materials, CNC machines are versatile and can handle thicker woods or harder materials. If you plan to scale up your production to include larger signs or furniture alongside your ornaments, a CNC router might be a more versatile investment.
The Cutting Plan
Our project includes a detailed drawing-vector cutting plan. This document organizes all the layers efficiently within the file, ensuring minimal material waste. By nesting the shapes optimally, you maximize the number of ornaments you can cut from a single sheet of plywood. This efficiency is crucial for anyone looking to keep costs low while maximizing output.
Assembly and Customization
Once your layers are cut, the fun truly begins. The assembly process is straightforward, which is one of the reasons these projects are so popular for educational settings and family crafts.
Step-by-Step Assembly
- Clean the Edges: Remove any charred edges left by the laser cutter using fine-grit sandpaper or a knife.
- Identify Layers: Each piece should be labeled or numbered according to the assembly guide. Start with the base layer.
- Stack and Secure: Depending on the design, you may use glue, wooden dowels, or interlocking tabs to stack the layers. Ensure each layer is aligned perfectly to maintain symmetry.
- Add Finishing Touches: Attach a ribbon loop or hook for hanging.
Painting and Decorating
One of the best features of plywood ornaments is their versatility. After cutting, you can paint in any color or decorate with embellishments. Acrylic paints work wonderfully on wood, allowing for vibrant hues or subtle pastels. You can also use markers, stamps, or even gold leaf to add a touch of elegance. Consider adding glitter, beads, or small charms to make each ornament truly one-of-a-kind.
Commercial Potential and Licensing
For entrepreneurs and side-hustlers, 3D layered ornaments represent a lucrative opportunity. Because the project is very economical and easy to assemble, it is great for mass production. You can create inventory quickly and sell at a premium price point, especially if you offer custom personalization.
Selling Your Products
You are free to print and sell as many products as you like. This means you can list your handmade ornaments on platforms like Etsy, sell them at local farmers' markets, or include them in corporate gift packages. The low cost of materials combined with the high perceived value of handmade goods makes this a profitable venture.
Important Licensing Restrictions
While you own the rights to the physical products you create, it is vital to understand the limitations regarding the digital assets. You may not sell or distribute the digital files in any way. This restriction protects the intellectual property of the designer. Reselling the vector files, sharing them publicly, or offering them as part of another digital product package is strictly prohibited. Always respect these terms to support the creative community and ensure fair compensation for designers.
Conclusion
Creating 3D layered Christmas tree ornaments is more than just a seasonal activity; it is a gateway into the world of digital fabrication and creative entrepreneurship. With the right tools—such as a laser cutter or CNC machine—and high-quality vector files, you can produce professional-grade decorations that delight friends, family, and customers alike.
By choosing 3mm plywood, optimizing your cutting plans, and embracing the freedom to customize, you unlock endless possibilities for creativity. Whether you are a beginner taking your first steps into woodworking or an experienced maker looking to expand your product line, this project offers a perfect blend of simplicity, efficiency, and artistic expression. Download the files, start cutting, and bring your festive vision to life today.